What is Nomad?
HashiCorp Nomad is a flexible workload orchestrator that deploys and manages containers and non-containerized applications across on-premises and cloud environments at scale. Unlike Kubernetes, Nomad is designed to be simple to operate while still providing powerful scheduling capabilities.
Key benefits of Nomad include:
- Simplicity: Single binary with minimal operational overhead
- Flexibility: Supports containers, virtual machines, and standalone applications
- Multi-region: Native support for multi-datacenter deployments
- Resource efficiency: Lower resource overhead compared to Kubernetes
Background
I started my homelab years ago and decided to take a unique approach by running containers in Nomad instead of Kubernetes, Docker Swarm, or other orchestration solutions. When I upgraded my server and installed TrueNAS Scale to manage storage, I needed a way to continue running Nomad for my homelab. This guide shows you how to accomplish this.
Prerequisites
Docker engine
Docker engine should be enabled before you start any further manipulations.
Nomad configuration file
We need a folder to store the Nomad configuration file and Nomad runtime data. For this setup, I created folders in my system at /mnt/vm/nomad/{etc,lib}.

You can use any path you prefer for your setup. Just keep in mind that you’ll need to update the following YAML application with the path you decide to use.
After creating the folder, you need to put the Nomad configuration file (updated according to your setup) into the /mnt/vm/nomad/etc folder.
Here is an example nomad.hcl configuration file:
data_dir = "/mnt/vm/nomad/lib"
bind_addr = "0.0.0.0"
datacenter = "dc1"
disable_update_check = true

server {
  enabled = true
  bootstrap_expect = 3

  default_scheduler_config {
    scheduler_algorithm = "spread"

    memory_oversubscription_enabled = true

    # reject_job_registration = false

    preemption_config {
      batch_scheduler_enabled    = true
      system_scheduler_enabled   = true
      service_scheduler_enabled  = true
      sysbatch_scheduler_enabled = true # New in Nomad 1.2
    }
  }

  server_join {
    retry_join = [
      # Servers list
    ]
  }
}

advertise {
  http = "<ip>"
  rpc  = "<ip>"
  serf = "<ip>"
}

client {
  enabled = true
  servers = [
    # Servers list
  ]
  options {
    "docker.volumes.enabled" = "true"
  }
  node_class = "main"
  meta {
    "arch" = "amd64"
    "machine" = "truenas"
  }
}

plugin "docker" {
  config {
    endpoint = "unix:///var/run/docker.sock"

    extra_labels = ["job_name", "job_id", "task_group_name", "task_name", "namespace", "node_name", "node_id"]

    gc {
      image       = true
      image_delay = "3m"
      container   = true

      dangling_containers {
        enabled        = true
        dry_run        = false
        period         = "5m"
        creation_grace = "5m"
      }
    }

    volumes {
      enabled      = true
      selinuxlabel = "z"
    }

    allow_privileged = true
    allow_caps       = ["audit_write", "chown", "dac_override", "fowner", "fsetid", "kill", "mknod", "net_bind_service", "setfcap", "setgid", "setpcap", "setuid", "sys_chroot", "net_raw", "ep"]
  }
}

telemetry {
  publish_allocation_metrics = true
  publish_node_metrics       = true
  prometheus_metrics         = true
}
Automate creation for /var/lib/docker
You can skip this step if you are not running anything in Nomad that requires access to this folder. In my case, I’m using CAdvisor to monitor container health, so it was easier to create this symlink than configure it within the Nomad job configuration.
To set this up, follow these steps:
- Advanced Settings in TrueNAS Scale:
System=>Advanced Settings - Find
Init/Shutdown Scriptsin this section and add a new script there - In the dialog, name the script and in the command box put this command:
ln -s /mnt/.ix-apps/docker /var/lib/docker. In theWhensection, selectPost Init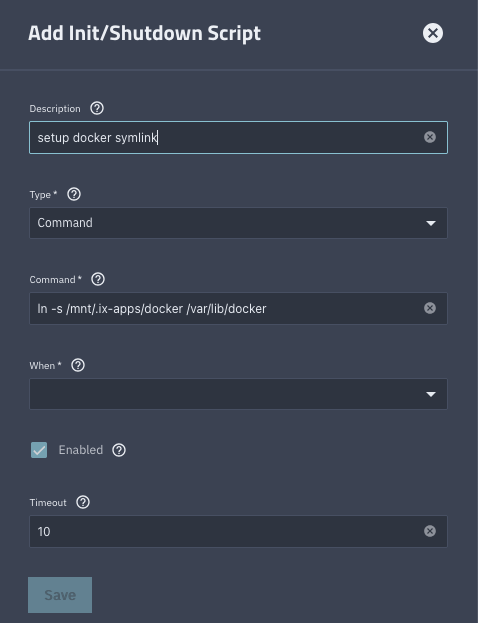
- Click save
To set up this symlink immediately, you can open the terminal in TrueNAS Scale, login as the root user and run the above command in the terminal.
Adding Nomad application
To add Nomad as an application, you need to do the following:
- Go to
Appssection in your TrueNAS Scale WebUI - Click
Discover apps - Click three dot button next to
Custom Appbutton, selectInstall from YAMLoption - Put the following YAML configuration and update the path where it differs from my example:
services:
  nomad:
    cap_add:
      - SYS_ADMIN
      - NET_ADMIN
    command:
      - agent
      - "-config"
      - /etc/nomad
    environment:
      NOMAD_SKIP_DOCKER_IMAGE_WARN: "true"
      NVIDIA_VISIBLE_DEVICES: void
      TZ: Europe/Berlin
    hostname: truenas.lo0.org.ua
    image: hashicorp/nomad:1.10.0
    network_mode: host
    platform: linux/amd64
    privileged: True
    pull_policy: always
    restart: always
    stdin_open: False
    tty: False
    volumes:
      - bind:
          create_host_path: False
          propagation: rprivate
        read_only: False
        source: /var/run/docker.sock
        target: /var/run/docker.sock
        type: bind
      - bind:
          create_host_path: True
          propagation: rshared
        read_only: False
        source: /mnt/vm/nomad/lib
        target: /mnt/vm/nomad/lib
        type: bind
      - bind:
          create_host_path: True
          propagation: rprivate
        read_only: False
        source: /mnt/vm/nomad/etc
        target: /etc/nomad
        type: bind
      - bind:
          create_host_path: False
          propagation: rshared
        read_only: False
        source: /sys
        target: /sys
        type: bind
volumes: {}
x-notes: |+

# HashiCorp Nomad

  Nomad containers orchestrator.

x-portals:

- host: 0.0.0.0
    name: Nomad
    path: /
    port: 4646
    scheme: http
- Set name for your application. It could be just
nomador whatever you like
- Click
Save
After those steps you should be able to access your Nomad cluster with the following link http://<your_truenas_ip_or_name>:4646.
P.S
I believe it’s possible to optimize and automate this configuration in many places. But I need to keep Nomad running and keep migrating my apps to the new server. Probably, I’ll come back to this project later when I free up my old server to convert it into a test environment.
P.P.S
You can also keep track on progress in this repo. I can’t promise it’ll be a lot 😄.